
1. Jenkins X 简介
在研发方面,通过 jx 命令,开发者可以新建仓库、生成应用脚手架、运行流水线、发布部署,最终运行在 Kubernetes 上。Jenkins X 给开发者提供了非常一致的开发体验。
在部署方面,通过 Terraform 提供的能力,可以在主流云厂商上直接创建集群。除此,Jenkins X Environment 还提供了对多环境的支持,通过定义环境之间的升级规则,各个环境上的应用可以很方便地进行发布、回滚、迁移。Jenkins X 给运维人员带来了极大便利。
一句话,Jenkins X 是面向云原生的一站式 DevOps 技术栈。
2. 架构和原理
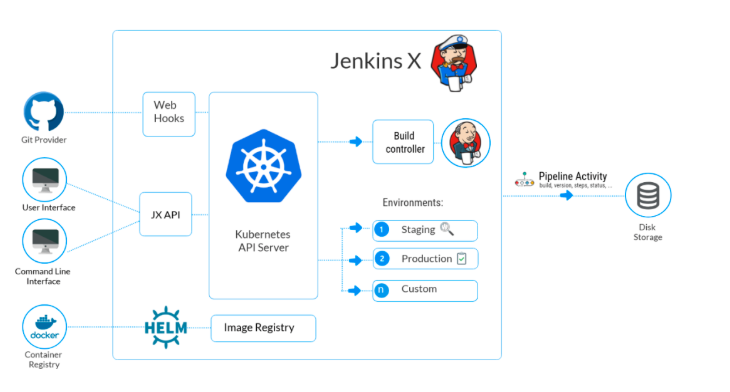
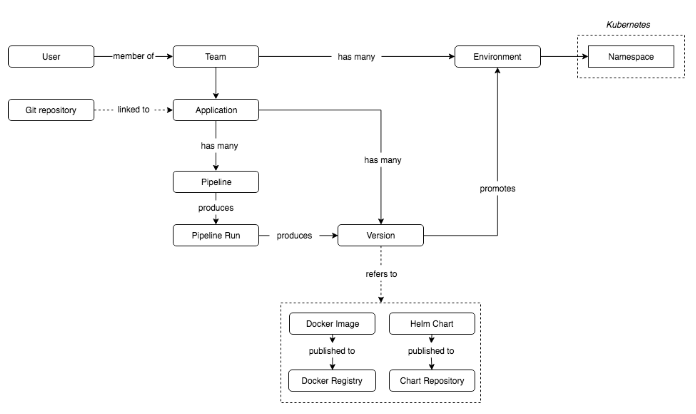
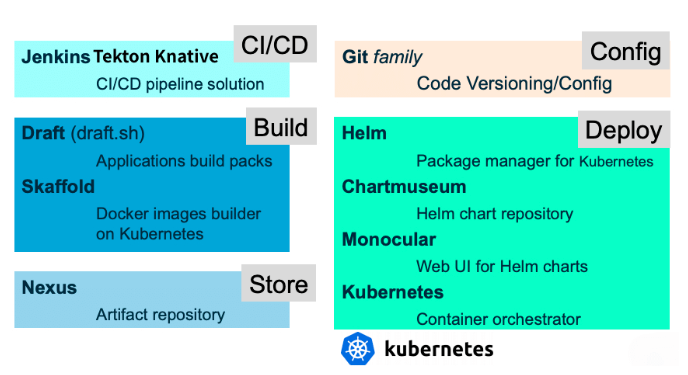
GitOps - 通过 Git 提交变更、使用 PR 进行授权的资源管理思想。
数据存储 - Git Repo。GitOps 驱动着 Jenkins X 。Jenkins X 对基础设施、配置、应用的所有变更,都记录在 Git Repo 中。当有 Git 事件发生时,触发 Jenkins X 执行。Jenkins X 只需要关注 Webhook 事件,仅当有 Git 事件发生时,才会动态创建 Pod 执行相应动作。
3. 在 Kubernetes 上安装 Jenkins X
jx create cluster 命令,使用 Terraform 可以直接创建集群,将集群作为配置信息进行管理。jx boot 命令进行安装,支持 GKE,EKS ,其他 Kubernetes 需要自行检查兼容性。这里是 Jenkins X on Kubernetes 兼容性对照表。我在自建的集群上尝试了下,坑还比较多,可以再等等,或者给社区提交 PR 。下面使用 jx install 命令进行安装。3.1 安装要求
Kubernetes 版本 > 1.8
kubectl versionClient Version: version.Info{Major:"1", Minor:"16", GitVersion:"v1.16.13", GitCommit:"39a145ca3413079bcb9c80846488786fed5fe1cb", GitTreeState:"clean", BuildDate:"2020-07-15T16:18:19Z", GoVersion:"go1.13.9", Compiler:"gc", Platform:"linux/amd64"}Server Version: version.Info{Major:"1", Minor:"16", GitVersion:"v1.16.13", GitCommit:"39a145ca3413079bcb9c80846488786fed5fe1cb", GitTreeState:"clean", BuildDate:"2020-07-15T16:10:14Z", GoVersion:"go1.13.9", Compiler:"gc", Platform:"linux/amd64"}
确认开启 RBAC
kubectl cluster-info dump | grep authorization-mode"--authorization-mode=Node,RBAC",
配置有默认的 Storage Class
kubectl get scNAME PROVISIONER AGElocal (default) openebs.io/local 2m
集群 Master 节点 CPU 最少 4 C
3.2 安装 jx、Git 客户端
安装 Jenkins X 客户端
curl -L
 | tar xzv mv jx /usr/local/bin
查看版本:
jx versionNAME VERSIONjx 1.3.1119jenkins x platform 2.0.2375Kubernetes cluster v1.16.13kubectl v1.16.13helm client v2.16.10+gbceca24helm server v2.16.10+gbceca24git git version 2.24.1Operating System CentOS Linux release 7.6.1810 (Core)
安装 Git 2.x
如果使用 Git 1.x 的版本,可能会遇到类似下面的错误:
FATAL: initialise build packs
failed: there was a problem ensuring the branch master has tracking info:
git output:
error: pathspec 'master'
did not match any file(s) known to git.: failed to run 'git checkout master'
command in directory
'/root/.jx/draft/packs/github.com/jenkins-x-buildpacks/jenkins-x-kubernetes',
output: 'error
解决办法是,进入提示目录,手工拉取。
cd /root/.jx/draft/packs/github.com/jenkins-x-buildpacks/jenkins-x-kubernetesgit pull
yum remove git*yum -y install https://packages.endpoint.com/rhel/7/os/x86_64/endpoint-repo-1.7-1.x86_64.rpmyum install -y gitgit versiongit version 2.24.1
3.3 测试集群是否满足要求
在安装完 jx 命令之后,可以使用下面的命令进行检测:
jx compliance run
jx compliance status
大约需要运行几十分钟,运行下面的命令可以看到最终的执行结果:
jx compliance results
最后删掉相关负载:
jx compliance delete
3.4 安装 Jenkins X 服务端
Jenkins X 内置的服务组件依赖 Ingress ,可以根据文档 使用 Helm 安装 Ingress 提前安装。
开始安装
jx install --verbose
? Cloud Provider kubernetes...> [x] helm[x] kubectl...? Please enter the name you wish to use with git: shaowenchen? Please enter the email address you wish to use with git: mail@chenshaowen.com...? Would you like wait and resolve this address to an IP address and use it for the domain? Yes...? Domain dev.chenshaowen.com...? github.com username: shaowenchen...Please click this URL and generate a tokenhttps://github.com/settings/tokens/new?scopes=repo,read:user,read:org,user:email,write:repo_hook,delete_repo? API Token: *****************************************? Select Jenkins installation type: Serverless Jenkins? Pick default workload build pack: Kubernetes Workloads: Automated CI+CD with GitOps PromotionJenkins X installation completed successfullyINFO[0094]********************************************************NOTE: Your admin password is: Sr5!8LZz!QfMD84KBZWR********************************************************
设置 Ingress Controller
kubectl -n kube-system edit svc jxing-nginx-ingress-controllerspec:externalIPs:- 192.168.13.74
查看服务
kubectl get ingress -n jxNAME HOSTS ADDRESS PORTS AGEchartmuseum chartmuseum.jx.dev.chenshaowen.com 192.168.13.74 80 2mdocker-registry docker-registry.jx.dev.chenshaowen.com 192.168.13.74 80 2mnexus nexus.jx.dev.chenshaowen.com 192.168.13.74 80 2m
如果没有可控的公网域名,在安装过程中,可以选择 nip.io 提供的域名,通过本地配置 hosts 进行访问:
x.x.x.x chartmuseum.jx.
192.168.13.74.nip.iox.x.x.x docker-registry.jx.
192.168.13.74.nip.iox.x.x.x nexus.jx.
192.168.13.74.nip.io
3.6 安装插件
Jenkins X 通过 Helm Chart 管理插件和应用,在 jenkinx-x/jx 仓库中可以查看已经集成的插件。通过 jx 命令,可以很方便地安装相关的插件,下面是部分插件列表。
ambassador - Create an ambassador addon
anchore - Create the Anchore addon for verifying container images
environment - Create an Environment Controller to handle webhooks and promote changes from GitOps
flagger - Create the Flagger addon for Canary deployments
gitea - Create a Gitea addon for hosting Git repositories
gloo - Create a Gloo and Knative Serve addon for creating serverless applications
ingress - Create an Ingress Controller to expose services outside of your remote Staging/Production cluster
istio - Create the Istio addon for service mesh
kubeless - Create a kubeless addon for hosting Git repositories
owasp-zap - Create the OWASP Zed Attack Proxy addon for dynamic security checks against running apps
pipeline-events - Create the pipeline events addon
prometheus - Creates a prometheus addon
prow - Create a Prow addon
这里安装 Prow 用于 ChatOps
jx create addon prow -n jx
kubectl get ingress -n jxNAME HOSTS ADDRESS PORTS AGEchartmuseum chartmuseum.jx.dev.chenshaowen.com 192.168.13.74 80 2mdeck deck.jx.dev.chenshaowen.com 192.168.13.74 80 2mdocker-registry docker-registry.jx.dev.chenshaowen.com 192.168.13.74 80 2mhook hook.jx.dev.chenshaowen.com 192.168.13.74 80 2mnexus nexus.jx.dev.chenshaowen.com 192.168.13.74 80 2mtide tide.jx.dev.chenshaowen.com 192.168.13.74 80 2m
3.5 卸载 Jenkins X
jx uninstallrm -rf /root/.jx
4. Jenkins X 使用
4.1 环境管理
查看环境
jx get envNAME LABEL KIND PROMOTE NAMESPACE ORDER CLUSTER SOURCE REF PRdev Development Development Never jx 0staging Staging Permanent Auto jx-staging 100 https://github.com/shaowenchen/environment-antdisco-staging.gitproduction Production Permanent Manual jx-production 200 https://github.com/shaowenchen/environment-antdisco-production.git
删除环境
jx delete env dev
创建环境
jx create env env-name
4.2 应用开发
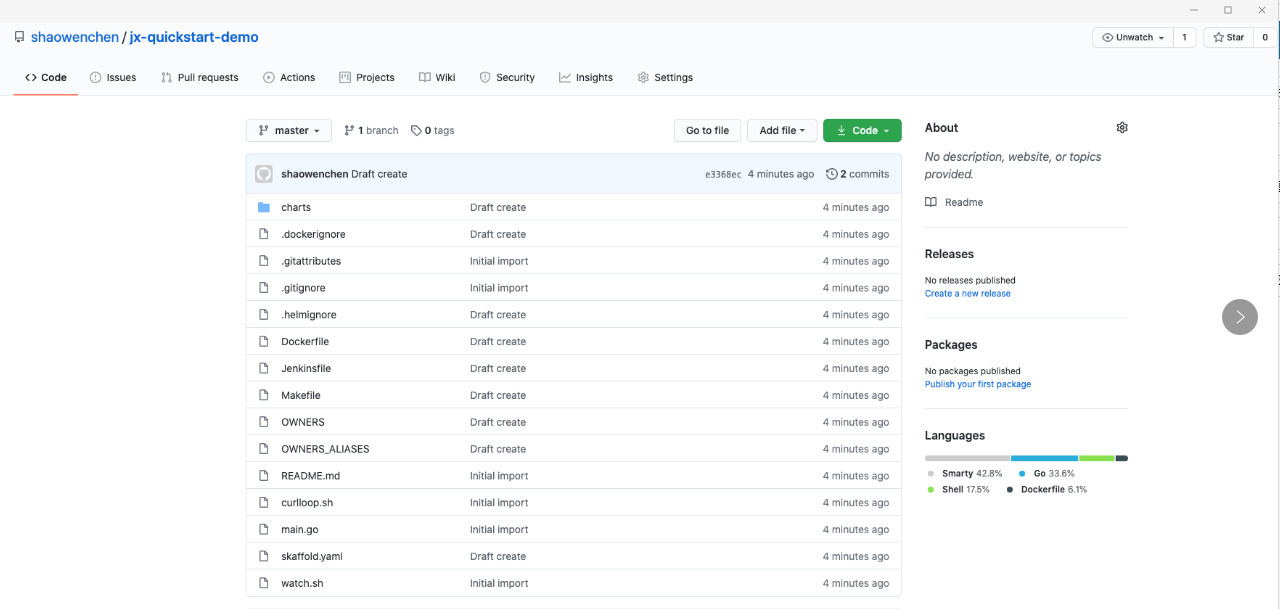
创建应用
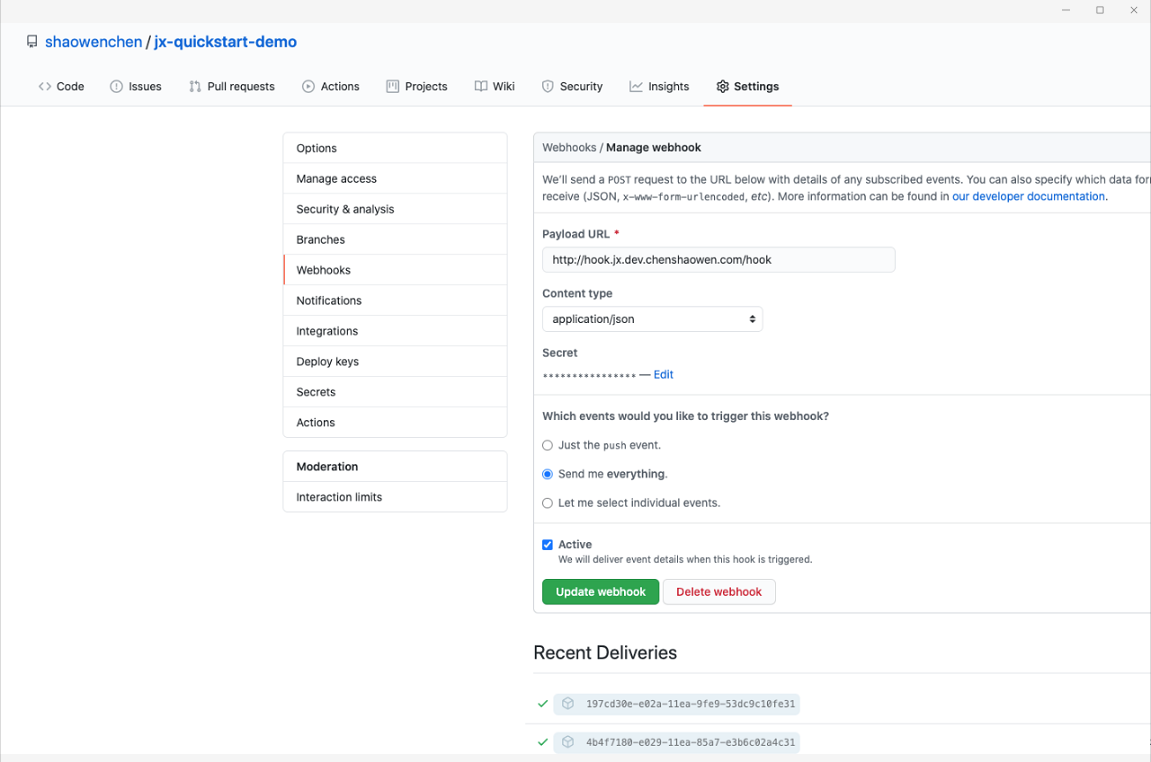
jx create quickstart? Do you wish to use shaowenchen as the Git user name? Yes? Which organisation do you want to use? shaowenchen? Enter the new repository name: jx-quickstart-demo? select the quickstart you wish to create jx-quickstart-demoINFO[0035] Pushed Git repository to https://github.com/shaowenchen/jx-quickstart-demoINFO[0051] Creating GitHub webhook for shaowenchen/jx-quickstart-demo for url http://hook.jx.dev.chenshaowen.com/hook
也可以直接从线上或者本地导入应用
jx import --url https://github.com/shaowenchen/jx-quickstart-demo.git
5. 参考
https://github.com/jenkins-x/jx https://jenkins-x.io/zh/docs/getting-started/setup/install/ https://jenkins-x.io/commands/jx/#jx https://www.weave.works/blog/gitops-operations-by-pull-request https://jenkins-x.io/docs/resources/guides/managing-jx/old/install-on-cluster/
温馨提示:文章内容系作者个人观点,不代表Docker中文对观点赞同或支持。
版权声明:本文为转载文章,来源于 互联网 ,版权归原作者所有,欢迎分享本文,转载请保留出处!


发表评论