
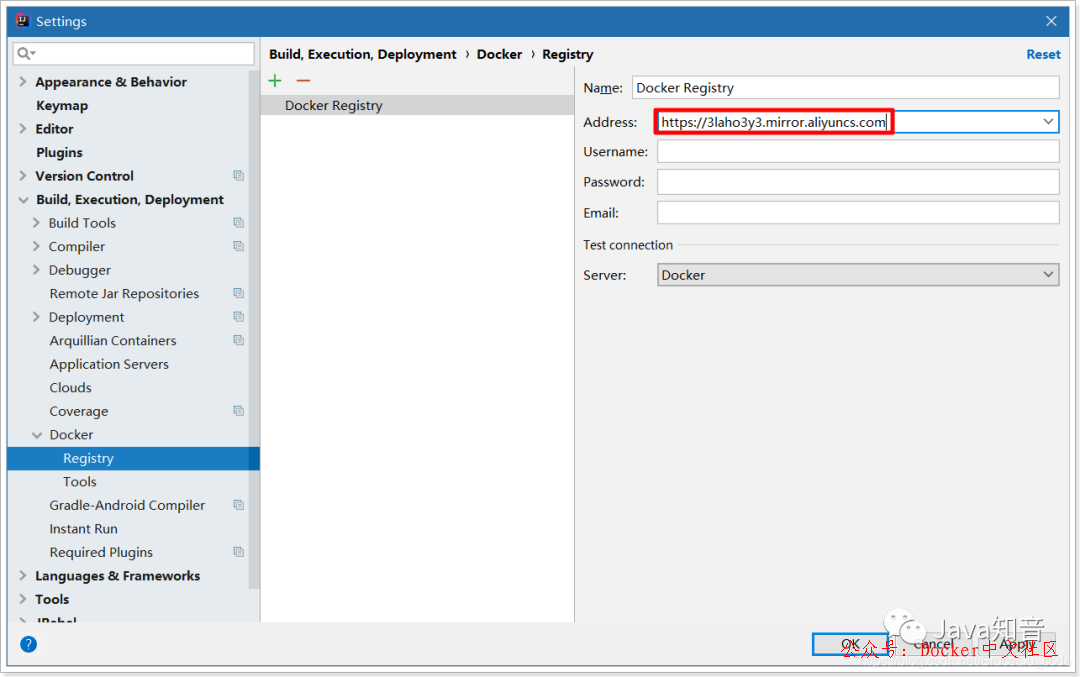
作者 | LemonSquash 来源 | cnblogs.com/npeng/p/14267007.html 将项目打包成jar 其中-d表示后台运行容器,这也就自然地解决的Spring Boot不支持后台运行应用程序的问题。 -p 8080:8080表示将容器内部的8080端口映射到宿主机器的8080端口,这样就可以通过宿主机器直接访问应 --name 给容器取一个容易记住的名字方便日后管理。 docker logs -f --tail=100 容器名称 首先编辑我们服务器上的docker文件 修改以ExecStart开头的行(centos 7):添加 修改后保存文件,然后重启docker 重启之后测试远程连接是否正常,这里的2375是之前配置的端口 看到返回信息基本上就没有问题了 然后开启端口,或者关闭防火墙,二者选其一即可 然后打开浏览器测试将之前的localhost修改为你的ip 首先下载docker插件,idea2019自带了docker插件。如果没有插件可以选择安装docker插件。 然后配置docker地址,在你的File | Settings | Build, Execution, Deployment | Docker 配置完成链接之后,出现了框中的内容即可. 链接成功之后会列出容器和镜像! 配置阿里云镜像加速器: 在我们持续集成过程中,项目工程一般使用 Maven 编译打包,然后生成镜像,通过镜像上线,能够大大提供上线效率,同时能够快速动态扩容,快速回滚,着实很方便。 docker-maven-plugin 插件就是为了帮助我们在Maven工程中,通过简单的配置,自动生成镜像并推送到仓库中。 pom.xml: 执行Maven打包命令:1.手工方式
1.1.准备Springboot jar项目
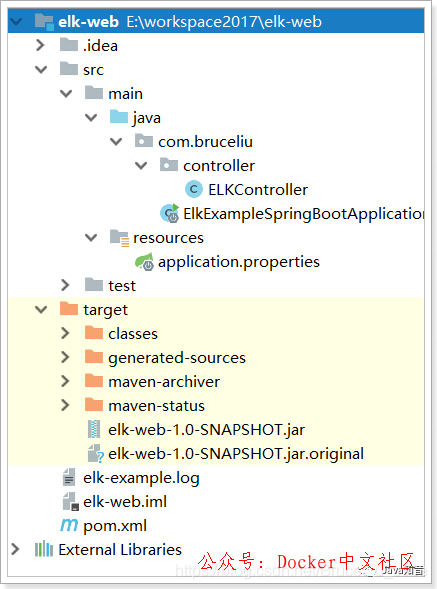
1.2.编写Dockerfile
FROM java:8
VOLUME /tmp
ADD elk-web-1.0-SNAPSHOT.jar elk.jar
EXPOSE 8080
ENTRYPOINT ["java","-Djava.security.egd=file:/dev/./urandom","-jar","/elk.jar"]1.3.构建容器
[root@VM_0_15_centos elk]# docker build -t elk .
Sending build context to Docker daemon 14.43 MB
Step 1/5 : FROM java:8
Trying to pull repository docker.io/library/java ...
8: Pulling from docker.io/library/java
5040bd298390: Pull complete
fce5728aad85: Pull complete
76610ec20bf5: Pull complete
60170fec2151: Pull complete
e98f73de8f0d: Pull complete
11f7af24ed9c: Pull complete
49e2d6393f32: Pull complete
bb9cdec9c7f3: Pull complete
Digest: sha256:c1ff613e8ba25833d2e1940da0940c3824f03f802c449f3d1815a66b7f8c0e9d
Status: Downloaded newer image for docker.io/java:8
 ---> d23bdf5b1b1b
Step 2/5 : VOLUME /tmp
 ---> Running in 0aec2dc2f98c
 ---> a52e844f25d4
Removing intermediate container 0aec2dc2f98c
Step 3/5 : ADD elk-web-1.0-SNAPSHOT.jar elk.jar
 ---> 3ba2f4fdddda
Removing intermediate container 860a0f748a23
Step 4/5 : EXPOSE 8080
 ---> Running in 1d3331cc2be6
 ---> e9ac33d26ce0
Removing intermediate container 1d3331cc2be6
Step 5/5 : ENTRYPOINT java -Djava.security.egd=file:/dev/./urandom -jar /elk.jar
 ---> Running in d354f8ee2af5
 ---> 8937e1ade6c7
Removing intermediate container d354f8ee2af5
Successfully built 8937e1ade6c7
1.4.运行容器
docker run -di --name 容器名称 -p 8080:8080 镜像名称
用。[root@VM_0_15_centos elk]# docker run -di --name myspringboot -p 8080:8080 8937e1ade6c7
04d6b2c347950a10c95a039c94a3e51d717e516dd8c3c742e3197687dfcf5523
[root@VM_0_15_centos elk]# docker ps -a
CONTAINER ID IMAGE COMMAND CREATED STATUS PORTS NAMES
04d6b2c34795 8937e1ade6c7 "java -Djava.secur..." 8 seconds ago Up 7 seconds 0.0.0.0:8080->8080/tcp myspringboot
[root@VM_0_15_centos elk]# 1.5.查看运行日志
[root@VM_0_15_centos elk]# docker logs -f --tail=100 04d6b2c34795
  .   ____          _            __ _ _
 /\\ / ___'_ __ _ _(_)_ __  __ _ \ \ \ \
( ( )\___ | '_ | '_| | '_ \/ _` | \ \ \ \
 \\/  ___)| |_)| | | | | || (_| |  ) ) ) )
  '  |____| .__|_| |_|_| |_\__, | / / / /
 =========|_|==============|___/=/_/_/_/
 :: Spring Boot ::        (v1.5.4.RELEASE)
2019-12-29 07:42:58.982  INFO 1 --- [           main] c.b.ElkExampleSpringBootApplication      : Starting ElkExampleSpringBootApplication v1.0-SNAPSHOT on 04d6b2c34795 with PID 1 (/elk.jar started by root in /)
2019-12-29 07:42:58.999  INFO 1 --- [           main] c.b.ElkExampleSpringBootApplication      : No active profile set, falling back to default profiles: default
2019-12-29 07:42:59.243  INFO 1 --- [           main] ationConfigEmbeddedWebApplicationContext : Refreshing org.springframework.boot.context.embedded.AnnotationConfigEmbeddedWebApplicationContext@5a2e4553: startup date [Sun Dec 29 07:42:59 UTC 2019]; root of context hierarchy
2019-12-29 07:43:03.652  INFO 1 --- [           main] s.b.c.e.t.TomcatEmbeddedServletContainer : Tomcat initialized with port(s): 8080 (http)
2019-12-29 07:43:03.699  INFO 1 --- [           main] o.apache.catalina.core.StandardService   : Starting service [Tomcat]
2019-12-29 07:43:03.714  INFO 1 --- [           main] org.apache.catalina.core.StandardEngine  : Starting Servlet Engine: Apache Tomcat/8.5.15
2019-12-29 07:43:04.012  INFO 1 --- [ost-startStop-1] o.a.c.c.C.[Tomcat].[localhost].[/]       : Initializing Spring embedded WebApplicationContext
2019-12-29 07:43:04.012  INFO 1 --- [ost-startStop-1] o.s.web.context.ContextLoader            : Root WebApplicationContext: initialization completed in 4772 ms
2019-12-29 07:43:04.449  INFO 1 --- [ost-startStop-1] o.s.b.w.servlet.ServletRegistrationBean  : Mapping servlet: 'dispatcherServlet' to [/]
2019-12-29 07:43:04.470  INFO 1 --- [ost-startStop-1] o.s.b.w.servlet.FilterRegistrationBean   : Mapping filter: 'characterEncodingFilter' to: [/*]
2019-12-29 07:43:04.470  INFO 1 --- [ost-startStop-1] o.s.b.w.servlet.FilterRegistrationBean   : Mapping filter: 'hiddenHttpMethodFilter' to: [/*]
2019-12-29 07:43:04.471  INFO 1 --- [ost-startStop-1] o.s.b.w.servlet.FilterRegistrationBean   : Mapping filter: 'httpPutFormContentFilter' to: [/*]
2019-12-29 07:43:04.471  INFO 1 --- [ost-startStop-1] o.s.b.w.servlet.FilterRegistrationBean   : Mapping filter: 'requestContextFilter' to: [/*]
2019-12-29 07:43:05.534  INFO 1 --- [           main] s.w.s.m.m.a.RequestMappingHandlerAdapter : Looking for @ControllerAdvice: org.springframework.boot.context.embedded.AnnotationConfigEmbeddedWebApplicationContext@5a2e4553: startup date [Sun Dec 29 07:42:59 UTC 2019]; root of context hierarchy
2019-12-29 07:43:05.765  INFO 1 --- [           main] s.w.s.m.m.a.RequestMappingHandlerMapping : Mapped "{[/exception]}" onto public java.lang.String com.bruceliu.controller.ELKController.exception()
2019-12-29 07:43:05.766  INFO 1 --- [           main] s.w.s.m.m.a.RequestMappingHandlerMapping : Mapped "{[/elkdemo]}" onto public java.lang.String com.bruceliu.controller.ELKController.helloWorld()
2019-12-29 07:43:05.772  INFO 1 --- [           main] s.w.s.m.m.a.RequestMappingHandlerMapping : Mapped "{[/error],produces=[text/html]}" onto public org.springframework.web.servlet.ModelAndView org.springframework.boot.autoconfigure.web.BasicErrorController.errorHtml(javax.servlet.http.HttpServletRequest,javax.servlet.http.HttpServletResponse)
2019-12-29 07:43:05.780  INFO 1 --- [           main] s.w.s.m.m.a.RequestMappingHandlerMapping : Mapped "{[/error]}" onto public org.springframework.http.ResponseEntity<java.util.Map<java.lang.String, java.lang.Object>> org.springframework.boot.autoconfigure.web.BasicErrorController.error(javax.servlet.http.HttpServletRequest)
2019-12-29 07:43:05.869  INFO 1 --- [           main] o.s.w.s.handler.SimpleUrlHandlerMapping  : Mapped URL path [/webjars/**] onto handler of type [class org.springframework.web.servlet.resource.ResourceHttpRequestHandler]
2019-12-29 07:43:05.869  INFO 1 --- [           main] o.s.w.s.handler.SimpleUrlHandlerMapping  : Mapped URL path [/**] onto handler of type [class org.springframework.web.servlet.resource.ResourceHttpRequestHandler]
2019-12-29 07:43:05.984  INFO 1 --- [           main] o.s.w.s.handler.SimpleUrlHandlerMapping  : Mapped URL path [/**/favicon.ico] onto handler of type [class org.springframework.web.servlet.resource.ResourceHttpRequestHandler]
2019-12-29 07:43:06.387  INFO 1 --- [           main] o.s.j.e.a.AnnotationMBeanExporter        : Registering beans for JMX exposure on startup
2019-12-29 07:43:06.537  INFO 1 --- [           main] s.b.c.e.t.TomcatEmbeddedServletContainer : Tomcat started on port(s): 8080 (http)
2019-12-29 07:43:06.562  INFO 1 --- [           main] c.b.ElkExampleSpringBootApplication      : Started ElkExampleSpringBootApplication in 8.771 seconds (JVM running for 9.832)
1.6.访问测试

2.Idea一键部署
2.1.配置docker远程连接端口
vim /usr/lib/systemd/system/docker.service-H tcp://0.0.0.0:2375 -H unix:///var/run/docker.sock \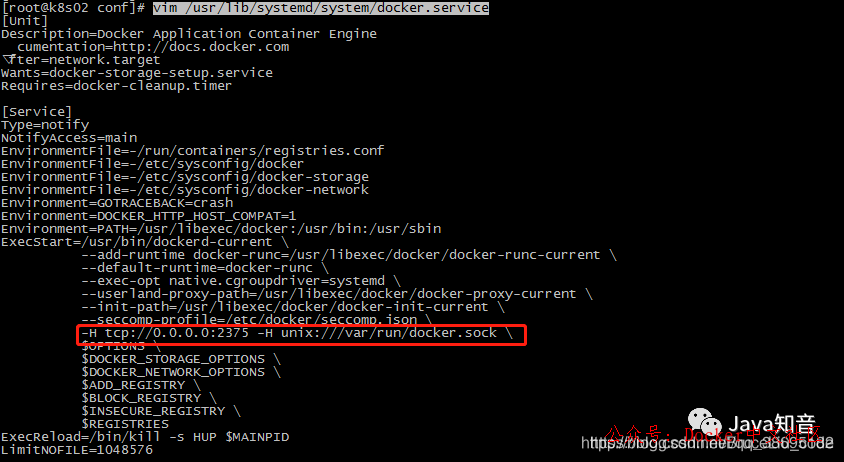
systemctl daemon-reload
service docker restartcurl http://localhost:2375/version[root@VM_0_15_centos elk]# curl http://localhost:2375/version
{"Version":"1.13.1","ApiVersion":"1.26","MinAPIVersion":"1.12","GitCommit":"7f2769b/1.13.1","GoVersion":"go1.10.3","Os":"linux","Arch":"amd64","KernelVersion":"3.10.0-957.21.3.el7.x86_64","BuildTime":"2019-09-15T14:06:47.565778468+00:00","PkgVersion":"docker-1.13.1-103.git7f2769b.el7.centos.x86_64"}firewall-cmd --zone=public --add-port=2375/tcp --permanent chkconfig iptables off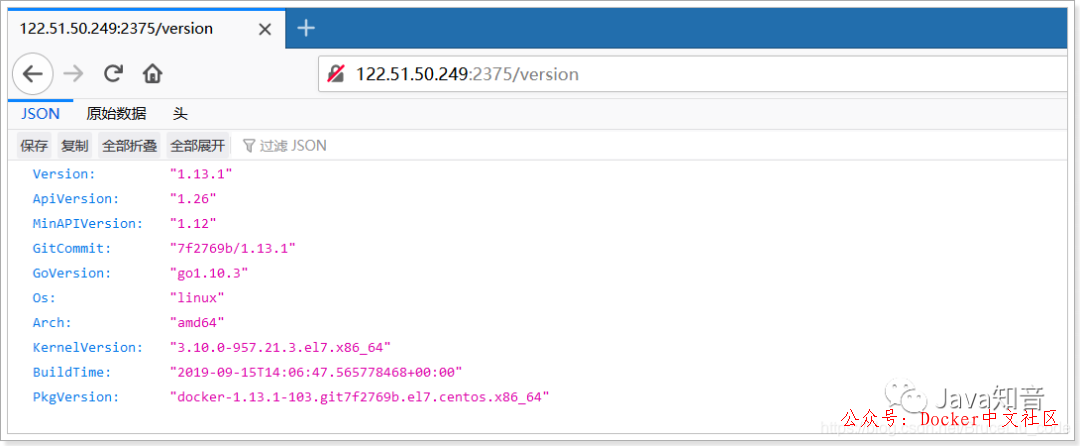
2.2.使用idea连接到docker

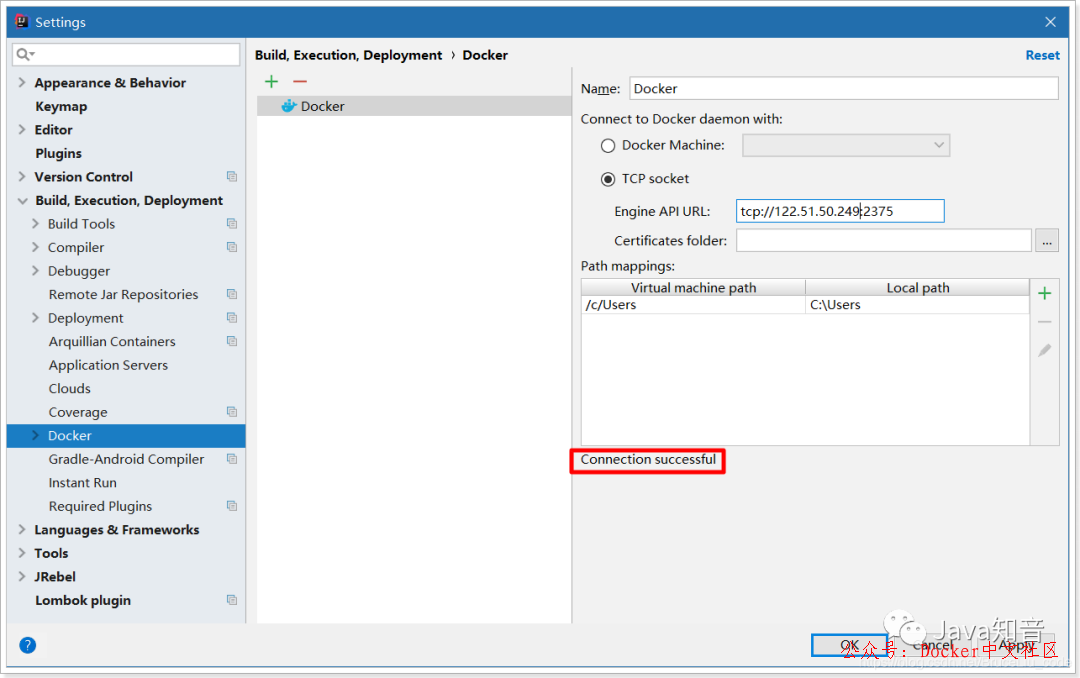

2.3.docker-maven-plugin 介绍
<build>

        <finalName>${project.artifactId}</finalName>

        <plugins>

            <plugin>
                <groupId>org.springframework.boot</groupId>
                <artifactId>spring-boot-maven-plugin</artifactId>
                <configuration>
                    <fork>true</fork>
                </configuration>
            </plugin>
            <!-- 跳过单元测试 -->
            <plugin>
                <groupId>org.apache.maven.plugins</groupId>
                <artifactId>maven-surefire-plugin</artifactId>
                <configuration>
                    <skipTests>true</skipTests>
                </configuration>
            </plugin>

            <!--使用docker-maven-plugin插件-->
            <plugin>
                <groupId>com.spotify</groupId>
                <artifactId>docker-maven-plugin</artifactId>
                <version>1.0.0</version>
                <!--将插件绑定在某个phase执行-->
                <executions>
                    <execution>
                        <id>build-image</id>
                        <!--用户只需执行mvn package ,就会自动执行mvn docker:build-->
                        <phase>package</phase>
                        <goals>
                            <goal>build</goal>
                        </goals>
                    </execution>
                </executions>
                <configuration>
                    <!--指定生成的镜像名-->
                    <imageName>bruceliu/${project.artifactId}</imageName>
                    <!--指定标签-->
                    <imageTags>
                        <imageTag>latest</imageTag>
                    </imageTags>
                    <!--指定基础镜像jdk1.8-->
                    <baseImage>java</baseImage>
                    <!--镜像制作人本人信息-->
                    <maintainer>bruceliu@email.com</maintainer>
                    <!--切换到ROOT目录-->
                    <workdir>/ROOT</workdir>
                    <cmd>["java", "-version"]</cmd>
                    <entryPoint>["java", "-jar", "/${project.build.finalName}.jar"]</entryPoint>
                    <!--指定远程 docker api地址-->
                    <dockerHost>http://122.51.50.249:2375</dockerHost>
                    <!-- 这里是复制 jar 包到 docker 容器指定目录配置 -->
                    <resources>
                        <resource>
                            <targetPath>/</targetPath>
                            <!--jar 包所在的路径  此处配置的 即对应 target 目录-->
                            <directory>${project.build.directory}</directory>
                            <!--用于指定需要复制的文件 需要包含的 jar包 ,这里对应的是 Dockerfile中添加的文件名 -->
                            <include>${project.build.finalName}.jar</include>
                        </resource>
                    </resources>
                </configuration>
            </plugin>

        </plugins>
    </build>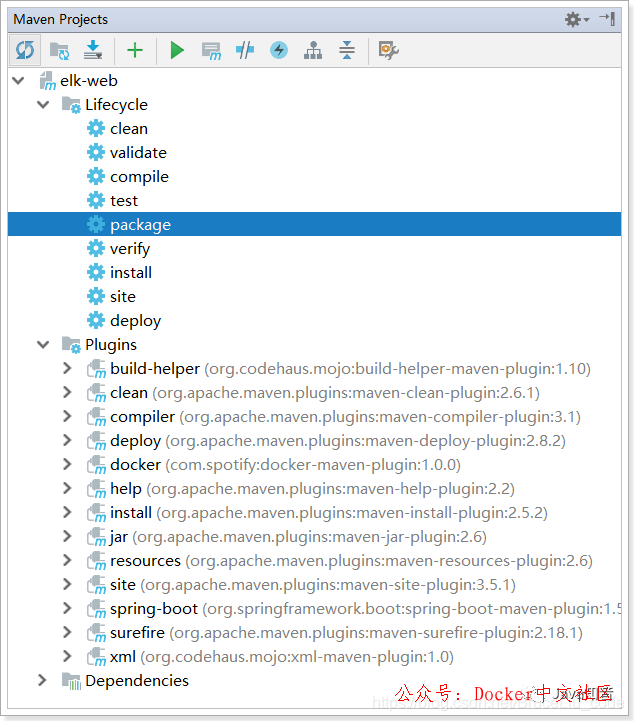
G:\softDevelopment\JDK8\bin\java -Dmaven.multiModuleProjectDirectory=E:\workspace2017\elk-web -Dmaven.home=E:\Maven20190910\apache-maven-3.6.1 -Dclassworlds.conf=E:\Maven20190910\apache-maven-3.6.1\bin\m2.conf "-javaagent:G:\idea2017\IntelliJ IDEA 2017.3.1\lib\idea_rt.jar=49260:G:\idea2017\IntelliJ IDEA 2017.3.1\bin" -Dfile.encoding=UTF-8 -classpath E:\Maven20190910\apache-maven-3.6.1\boot\plexus-classworlds-2.6.0.jar org.codehaus.classworlds.Launcher -Didea.version=2017.3.7 -s E:\Maven20190910\apache-maven-3.6.1\conf\settings.xml -Dmaven.repo.local=E:\Maven20190910\repository package
[INFO] Scanning for projects...
[WARNING]
[WARNING] Some problems were encountered while building the effective model for com.bruceliu.elk.demo:elk-web:jar:1.0-SNAPSHOT
[WARNING] 'build.plugins.plugin.(groupId:artifactId)' must be unique but found duplicate declaration of plugin org.springframework.boot:spring-boot-maven-plugin @ line 36, column 21
[WARNING]
[WARNING] It is highly recommended to fix these problems because they threaten the stability of your build.
[WARNING]
[WARNING] For this reason, future Maven versions might no longer support building such malformed projects.
[WARNING]
[INFO]
[INFO] -------------------< com.bruceliu.elk.demo:elk-web >--------------------
[INFO] Building elk-web 1.0-SNAPSHOT
[INFO] --------------------------------[ jar ]---------------------------------
[INFO]
[INFO] --- maven-resources-plugin:2.6:resources (default-resources) @ elk-web ---
[INFO] Using 'UTF-8' encoding to copy filtered resources.
[INFO] Copying 1 resource
[INFO] Copying 0 resource
[INFO]
[INFO] --- maven-compiler-plugin:3.1:compile (default-compile) @ elk-web ---
[INFO] Changes detected - recompiling the module!
[INFO] Compiling 2 source files to E:\workspace2017\elk-web\target\classes
[INFO]
[INFO] --- maven-resources-plugin:2.6:testResources (default-testResources) @ elk-web ---
[INFO] Using 'UTF-8' encoding to copy filtered resources.
[INFO] skip non existing resourceDirectory E:\workspace2017\elk-web\src\test\resources
[INFO]
[INFO] --- maven-compiler-plugin:3.1:testCompile (default-testCompile) @ elk-web ---
[INFO] Nothing to compile - all classes are up to date
[INFO]
[INFO] --- maven-surefire-plugin:2.18.1:test (default-test) @ elk-web ---
[INFO] Tests are skipped.
[INFO]
[INFO] --- maven-jar-plugin:2.6:jar (default-jar) @ elk-web ---
[INFO] Building jar: E:\workspace2017\elk-web\target\elk-web.jar
[INFO]
[INFO] --- spring-boot-maven-plugin:1.5.4.RELEASE:repackage (default) @ elk-web ---
[INFO]
[INFO] --- docker-maven-plugin:1.0.0:build (build-image) @ elk-web ---
[INFO] Using authentication suppliers: [ConfigFileRegistryAuthSupplier]
[INFO] Copying E:\workspace2017\elk-web\target\elk-web.jar -> E:\workspace2017\elk-web\target\docker\elk-web.jar
[INFO] Building image bruceliu/elk-web
Step 1/6 : FROM java
 ---> d23bdf5b1b1b
Step 2/6 : MAINTAINER bruceliu@email.com
 ---> Running in 787e4786fbd4
 ---> 4d4519f52fda
Removing intermediate container 787e4786fbd4
Step 3/6 : WORKDIR /ROOT
 ---> f40dcbc9a9eb
Removing intermediate container 7fa6bbc9d1df
Step 4/6 : ADD /elk-web.jar //
 ---> c7f1107ae3d4
Removing intermediate container f370558f1a38
Step 5/6 : ENTRYPOINT java -jar /elk-web.jar
 ---> Running in e4480ced0829
 ---> b634ca5fa5ad
Removing intermediate container e4480ced0829
Step 6/6 : CMD java -version
 ---> Running in cc6a064ef921
 ---> cf9a5d50326b
Removing intermediate container cc6a064ef921
Successfully built cf9a5d50326b
[INFO] Built bruceliu/elk-web
[INFO] Tagging bruceliu/elk-web with latest
[INFO] ------------------------------------------------------------------------
[INFO] BUILD SUCCESS
[INFO] ------------------------------------------------------------------------
[INFO] Total time:  10.329 s
[INFO] Finished at: 2019-12-29T22:44:06+08:00
[INFO] ------------------------------------------------------------------------

Process finished with exit code 0
温馨提示:文章内容系作者个人观点,不代表Docker 中文对观点赞同或支持。
版权声明:本文为转载文章,来源于 LemonSquash ,版权归原作者所有,欢迎分享本文,转载请保留出处!



发表评论